

Original Post: http://rochacbruno.com.br/web2py-and-redis-queue/
RQ (Redis Queue)
RQ (Redis Queue) is a simple Python library for queueing jobs and processing them in the background with workers. It is backed by Redis and it is designed to have a low barrier to entry. It should be integrated in your web(2py) stack easily.
web2py
Free open source full-stack framework for rapid development of fast, scalable, secure and portable database-driven web-based applications. Written and programmable in Python.
Queueing jobs with RQ and web2py
web2py as many other web frameworks works in a request -> response environment, which means that there is a lifetime for things to be done. This lifetime we call "request time", it is the time between the client requests a resource (i.e hits an url of our app or post a form) and the time that the server gives the response back to the client (i.e: The server sends html, json or any other kind of response).
The problem with this is the fact that we have a time-out and the user does not want to wait for tasks to be done, I mean in example for creating image thumbnails, users have to upload a picture and then wait for the thumbnail to be created to have a response from server. Or in the case of sending an email, user fill a contact form and have to wait for the message to be sent. It can take a long time and sometimes it will fail.
The solution is to enqueue that jobs on background and then watch its results to give a response to the user, this response can be given through a websocket or ajax long pooling. (I will not cover this here)
Setting up
-
install Redis
-
In debian based linuxes you can do:
sudo apt-get install redis-server
-
In debian based linuxes you can do:
-
Install RQ (redis queue)
-
sudo pip install rq
-
case 1 : Sending email in background
User will fill our contact form and then click in submit, instead of sending the email we are going to enqueue the email to be sent by the redis queue.
1. In your models create your Queue object (also you need to have the mail settings)
models/db.py
from gluon.tools import Mail
mail = Mail()
mail.settings.server = "smtp.google.com:587"
mail.settings.sender = "you@gmail.com"
mail.settings.login = "you:yourpassword"
models/queue.py
from redis import Redis
from rq import Queue
q = Queue(connection=Redis())
The above will use the default Redis connection port to localhost, take a look at RQ docs if you need to set another redis server.
2. In your controller create the contact action which returns a form.
controllers/default.py
def contact():
    form = SQLFORM.factory(Field("name"), Field("message"))
    if form.accepts(request):
        # enqueue the email to be sent!
        q.enqueue(mail.send,
                  to="you@gmail.com",
                  subject="%(name)s contacted you" % form.vars,
                  message=form.vars.message)
        # do whatever you want
        response.flash = "email successfully sent!"
case 2 : Creating an image thumbnail
User will upload a picture and you are going to create a THUMBNAIL and store the thumbnail in /static/thumbs folder
1. Define some models
models/db.py
Picture = db.define_table("pictures",
    Field("name"),
    Field("picture", "upload")
)
models/queue.py
from redis import Redis
from rq import Queue
q = Queue(connection=Redis())
2. Create the form
controllers/default.py
# requires PIL to be installed
# sudo apt-get install python-imaging
from gluon.contrib.imageutils import THUMB

def add_picture():
    form = SQLFORM(Picture, submit_button="send")
    if form.process().accepted:
        #enqueue thumbnail to be created
        q.enqueue(THUMB, form.vars.picture)
Put the workers to work
On the cases above we just enqueued tasks to be executed by the workers, now we need the worker running.
web2py environment
The worker should run under the web2py environment, because we are using web2py modules to send emails and create the thumbnail, so the RQ worker should be started with this script.
1. Create the web2py RQ worker
/some/path/web2py-rq.py
import sys
from rq import Queue, Connection, Worker

# Provide queue names to listen to as arguments to this script,
# similar to rqworker
with Connection():
    qs = map(Queue, sys.argv[1:]) or [Queue()]
    w = Worker(qs)
    w.work()
Start the above worker under web2py environment
cd /path/to/web2py
python web2py.py -S yourappname -M -R /some/path/web2py-rq.py
With the above worker running the enqueued tasks will be executed and then worker will keep listening for new tasks.
You can also put the worker to run in backgroungm for this you shoud use nohup python web2py.py -S yourappname -M -R /some/path/web2py-rq.py & or even better you can put this to run under the supervidord
with the worker running you should see this console:
python web2py/web2py.py -S app -M -R /projects/web2py-rq.py
web2py Web Framework
Created by Massimo Di Pierro, Copyright 2007-2012
Version 2.4.1-alpha.2+timestamp.2012.12.28.16.18.51
Database drivers available: SQLite(sqlite3), MySQL(pymysql), PostgreSQL(pg8000), IMAP(imaplib)
[2012-12-31 00:33] DEBUG: worker: Registering birth of worker precise64.15755
[2012-12-31 00:33] INFO: worker: RQ worker started, version 0.3.2
[2012-12-31 00:33] INFO: worker:
[2012-12-31 00:33] INFO: worker: *** Listening on default...
[2012-12-31 00:34] INFO: worker: default: send(to='someone@gmail.com', message='blah', subject='testing') (a069b2c6-f908-4806-8534-b00c43996cf4)
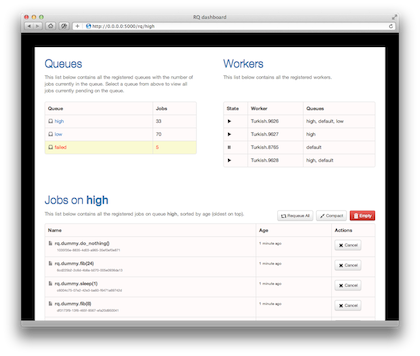
Monitoring
RQ has some nice ways for monitoring the jobs by command-line or by its dashboard.
command line:
To see what queues exist and what workers are active, just type rqinfo:
$ rqinfo
high       |██████████████████████████ 20
low        |██████████████ 12
default    |█████████ 8
3 queues, 45 jobs total

Bricktop.19233 idle: low
Bricktop.19232 idle: high, default, low
Bricktop.18349 idle: default
3 workers, 3 queues
As you can see it is possible to start many workers.
Dashboard
The easiest way is probably to use the RQ dashboard, a separately distributed tool, which is a lightweight webbased monitor frontend for RQ, which looks like this:
RQ dashboard https://github.com/nvie/rq-dashboard
Comments (1)
0
franciss 10 years ago
Hi Bruno. I'm too newbie on web2py so I don't know if this question makes sense but... here it goes anyway :)
On both cases of this recipe, you are creating the queue.py under models/, why?
Shouln't this be stored in modules/? (something like modules/redis/queue.py?)
I'm asking this question after reading this:
https://groups.google.com/forum/#!msg/web2py/js0VAKK6Dlw/CJ46I-0wT0wJ
in particular "models are executed at every request, so a celery instance defined in models continues to instantiate new connections to Redis" maybe the same problem could happen here with rq.
Cheers and thanks for share your knowledge :)
Franc